Wednesday, March 9, 2011

Sweet River Chicken Sandwich

One of my kids favorite restaurants is Red Robin, and really, what's not to love?  Bottomless french fries, giant burgers,  unlimited refills all of which are perfect for feeding hungry teenagers.  Unfortunately there is not one near us, so it is a rare treat usually reserved for our even rarer vacations.
My oldest son loves the Whiskey River Chicken Sandwich (it's our favorite sandwich to share).   A couple of years ago I decided to see if I could come up with something close. I call my version the Sweet River Chicken Sandwich.
Sweet River Chicken Sandwich

This is a little time consuming to make and definitely not very healthy so we reserve this for special occasions!

You will need:
Buns
Chicken Breast
BBQ sauce
Lettuce
Tomato
Onion Straws (see below for directions)
"Red Bird" Seasoning (recipe below)

First make your Onion Straws

Heat 2" of oil in skillet or deep fryer.

Thinly slice a large onion.
Mix together 1/2 C. of flour and 2 tsp. "Red Bird" seasoning.  Toss onion with flour to coat.
Deep fry the onion at 325 degrees until crispy and browned.  The time will depend upon thin your onion is cut.
Place onion straws on paper towels to drain.  To keep warm place in a 150 degree oven.


Next, cook your chicken breasts.  You can grill them or pan fry them.  Sprinkle with "Red Bird" seasoning as they are cooking.

In the last few minutes of cooking, baste both sides of chicken with BBQ sauce.  We use Sweet Baby Rays Original (is there any other?!).

Now to assemble your sandwich:
Layer a bun with the chicken, onion straws, lettuce and tomato.  Add a slice of colby cheese, if you like.


Enjoy with french fries and lemonade!

"Red Bird" Seasoning Blend
1/4 C. salt
1 pkg. Lipton Tomato Soup powder
1 Tbsp. chili powder
1/2 tsp. cumin
1/2 tsp. basil

Mix together and store in a spice container.

We love this sprinkled on burgers, fries and chicken.

Tuesday, March 8, 2011

Crockpot Lasagna

This is one of those easy meals for busy days!

Crockpot Lasagna

1-2 jars Spaghetti Sauce
6-8 Lasagna Noodles
32 ounces Cottage cheese
1 1/2 Cup. Mozzarella Cheese
1 tsp. Italian Seasoning

In a bowl mix cottage cottage cheese, 1 C. mozzarella cheese and Italian seasoning.
In bottom of crockpot, place a thin layer of sauce.

Next, place a layer of uncooked noodles.  Break noodles to fit and cover as much sauce as possible.

Cover noodles with 1/2 of cottage cheese mixture.
Repeat layers and top with remaining 1/2 C. mozzarella cheese.

If your sauce is really thick, pour 1/2 cup of water around edges.
Cover and cook on low 5-6 hours or high 2-3 hours.
Serves 6.

You can adjust the amounts for your family size, add an extra layer or make a half batch for a small family.  Your measurements do not have to be exact--add extra cheese if you like it really cheesy!

Serve with garlic bread and salad!

Wednesday, March 2, 2011

Topopo Salad

In the town where I grew up there was a little Mexican restaurant that served this amazing salad called a Topopo. It is a layered delight of yummy goodness!  It is a long way back to my hometown for a salad, so I have created my own version.

Topopo Salad
Topopo Salad

Ingredients:
-tortilla chips
-refried beans
-guacamole
-romaine lettuce
-frozen green peas
-chicken (cooked and shredded)
-parmessan cheese
-topopo dressing (see below)

This is one of those recipes that I throw together.  It really depends on how many people you are having how much of each ingredient you need.  I keep a bottle of the topopo dressing in my fridge for whenever the craving strikes.

1. Warm your tortilla chips in the oven and sprinkle with a little bit of seasoning salt.  (we use flour tortilla chips because of allergies). Layer on plate or platter.
2.  Add warm refried beans
3. Top with your favorite guacamole (we like avocados mashed with a little lime juice).

4. Cover with a generous layer of finely chopped romaine lettuce mixed with the frozen green peas, thawed. (we just run the frozen green peas under some hot water in a strainer for a minute and use them)


5. Add a layer of cooked, shredded chicken (We often add some topopo dressing to the meat as it heats up).

6. Sprinkle salad generously with the topopo dressing and then top liberally with parmessan cheese.  Your salad should sort of look like an exploding volcano

Topopo Dressing
1/2 C. canola oil
1/4 C. white vinegar
1 1/2 tsp. sugar
1/2 tsp. salt
1/2 tsp. celery seed
juice of 1/2 lime

Mix together and shake well.  Store in refrigerator.

I have made huge platters of this for parties and there is never any leftovers!  If you keep chopped cooked chicken in the freezer you can throw this meal together in about 15 minutes (throw the chicken and beans on the stove to heat while you warm the chips and chop the lettuce--layer it on a platter and serve).

Homemade Flavored Extracts (Vanilla, Lemon, etc....)

Five minutes and two ingredients per extract and you are on your way to a cupboard full of flavored extracts for all your baking needs!

Homemade extracts are simple, inexpensive and there are no artificial ingredients.

Homemade Extract

Ingredient of choice for extract (vanilla beans, lemons, oranges,limes, fresh mint, raspberry,etc.....)
Vodka (inexpensive, plain vodka)


Extract ingredients (note: this is NOT inexpensive vodka (I had to borrow a bottle for pictures))
 If you are using vanilla beans, split 3 or 4 beans in half down the center and place in a jar.  For lemons, limes or oranges, zest the outer rind of 2 fruit.  For mint, coarsely chop 1/4 cup of mint leaves. For fruit (raspberry, strawberry, etc...) crush 1/4 C. of ripe fruit.

slice vanilla beans down the center to release the seeds

zest of 2 lemons in jar
Place your prepared ingredient in a pint jar and add 1 cup of vodka.  Cap tightly and shake.

lemon extract in progress
Let jars sit for 3-6 weeks, shaking occasionally.  The extracts will darken (especially the vanilla) and will have a nice scent of their main ingredient.  If you used fresh fruit, strain your extract.  You can leave the vanilla beans and citrus rinds in the jar.  As you use up your extract, you can add more vodka to replenish.  I have had the same jar of vanilla beans for 2 years now and they are just getting to the point of needing to be replaced.  You could also occasionally add more citrus rind or mint leaves to your jar to increase the flavor.  Fruit extracts should always be made in smaller batches and not replenished, the flavor tends to break down over time.

Use your homemade extracts just like you would store bought extracts. Add a splash to cake batter or cookies for a yummy twist. I especially like chocolate cake with mint extract or sugar cookies with lemon extract.

*There is alcohol in these extracts, so if this is of concern for you be sure to only use the extracts in cooked items (the alcohol will cook off).


*Extracts make great gifts!  I once made vanilla extract for all my friends for Christmas and gave it to them with my favorite cookie recipe. How about a basket of different extracts for a friend who loves to cook or a couple just getting started on their new life together?

vanilla extract for gift giving

Wednesday, February 23, 2011

Crockpot Coffee Kitchen Soap--Tutorial

This is one of my favorite handmade soaps.  It works great for onion and garlic smells on your hands.  You can buy most of the ingredients at your local grocery store.

This process takes a while, but it is worth the end result.  I got 16 slices of soap and 4 decent size (but not pretty) soap balls.


Ingredients:

Cold coffee
Olive Oil
Palm Oil
Coconut Oil
Ground coffee (not instant)
Almond or Castor oil
Lye* (see notes)

Equipment:

Crockpot (I use a crockpot from a garage sale that is just for soap making)
Stainless steel spoon (not aluminum!) -you can use a wooden spoon, just don't use it for food when you are done
Glass jar for mixing lye
Wooden skewer for mixing lye
Postal or kitchen scale that weighs in 1/10th of ounce increments
Phenoolphthalein or litmus strips (in the pool supply aisle)
Soap Mold (I use a pringles can!)
Stick blender (helpful but not necessary)


ALL INGREDIENTS ARE DONE BY WEIGHT!

Weigh 12 oz. of cold coffee into a glass jar.  Weigh 4.8 oz. of lye into a small jar or bowl.  Slowly add lye into coffee (DO NOT add the coffee to the lye, it will erupt and can cause burns!), stirring with a wooden skewer.  DO NOT breathe the fumes.  This is going to get HOT!  Stir until all of the lye is dissolved.  Set aside.


Weigh 18 oz. of olive oil, 8 oz. of coconut oil and 6 ounces of palm oil into your crockpot.  I add each oil seperately and then reset the scale.


Turn the crockpot on high to melt the oils.
When the oils are melted, pour in the lye mixture and stir to incorporate.


Stir with the spoon constantly without splashing until mixture resembles thick set pudding.  This will take approx. 15-30 min. depending on the temperature of your oils.  If you have a stick blender, pulse in short bursts, alternating with stirring, you should reach the proper consistency in about 5-8 min. with a stick blender.

Once you have reached this stage (called trace), you put the lid on the crockpot and let it cook.  Check back in about 10  minutes.  The outsides should be boiling and it should start to look like a gel.

Stir and put the lid back on for another 5-10 minutes.  I like to check and stir every 5-10 minutes.  After about 15 minutes your soap should resemble applesauce, it will be gelled and chunky looking.
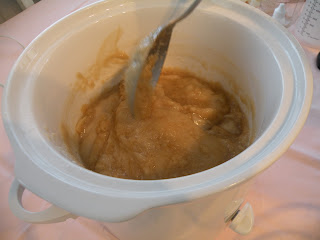
applesauce stage


close-up of applesauce stage, with a drop of phenolphthalein
(the red means it is not neutral)

Keep stirring and checking your soap, it will start to get smoother and will eventually resemble mashed potatoes.  Once it has reached this stage, take a small amount and cool it on a plate.  Rub it between your fingers, it should feel waxy.  Check the ph to see if it is neutral.  Continue cooking until the soap tests neutral on the plate. Usually it takes about 30 minutes of total cooking time (after you reach trace),  I will usually finish my soap after 30 min. even if I am not quite sure it is neutral.  You can check the finished soap to be sure it is neutral, and if it is not, all you have to do is let it cure for a week or two.
mashed potato stage
Once your soap is ready, add 2 tbsp. almond or castor oil and 2 tbsp. ground coffee  and  mix well.  I like to leave it a little swirled.
Place the finished soap into the mold of your choice.  I find it is best to put some soap in then tap the mold a few times to pack it in and repeat until full.  I had some soap leftover so I scooped it onto a plate and formed it into balls as it cooled (these are not pretty, but they still function).
Let soap cool completely and remove from mold.  In this case, I just tear the container off from the soap.

Slice soap into approx. 1/2" slices.  Enjoy clean and fresh smelling hands!


NOTES:

-This is NOT a child friendly project, lye is dangerous stuff.  Use caution and common sense.  I always made soap when my kids were younger, they knew they were not allowed in the kitchen when mom was making yucky stuff!
-Lye is a form of drain cleaner and can be found at many hardware stores and home improvement centers.  Read the labels to make sure you have 100% lye.
-Wear gloves when handling the lye.
-You can check your soap with phenolphthalein or litmus strips when it is done, it should be neutral. 
-Leave your bars out to air dry, flipping them over every day, for a week and they will be harder and store longer.
-If you want a plain soap, use water instead of the coffee and leave out the ground coffee.  You could add essential oil with the almond oil right before you mold your soap, just use about 1 tsp. of your favorite scent. 
-You could also make this other scents like lavender or peppermint and add 2 Tbsp. lavender or peppermint leaves.
-This is one of my favorite hostess gifts with a handmade dishcloth.

Friday, February 18, 2011

A peek at my pantry

Over the years we have moved a lot!  We have lived in a lot of small places where I have had to be very creative with my pantry storage.  Our current house is HUGE for us, especially square footage wise, but it still seriously lacks in good storage, in fact, I am pretty sure the 1000 sq. ft. mobile home we lived in for several years had almost as much usable storage space.

Because of all the food allergies in our family and the fact that I make almost everything from scratch, pantry storage is one of the most important spaces wherever we live.  This house has a large open kitchen and dining room, but the cupboards are narrow and don't hold much, so other than one spice cupboard, we have no food stored in the cupboards.  Instead, when we were moving in, we were blessed with to rather large bookcase that I immediately knew what I was going to do with them.


They were almost the same size and the shelf spacing was almost identical, so I screwed them together and gave them a paint job.  We had a long, unused wall in our kitchen that became their home.  This is my main pantry storage.

Notice my little coffee bar off to one side.

I started out with assorted jar, containers, etc... and slowly collected the glass jars.  I asked for jars for birthdays, Christmas, any excuse I could think of to add to my collection.  The jars were less than $5 a piece, so it was not too much to ask for from family.
I have labels done for all the big jars and will hopefully finish my labels for the smaller jars soon.  The jars hold all of my baking supplies, mixes, pastas, nuts, cereal, etc...   When we get in from grocery shopping we fill up any jars that need filling right away.  Just eliminating all the packaging makes such a big difference.  My spices, which I buy bulk, are all in the quart or half gallon canning jars, along with all my spice mixtures that I make myself (apple pie spice, taco seasoning, Italian seasoning, etc....).


Whatever extra we have, plus all of our boxed and canned goods are stored in a little closet at the top of our stairs.  This closet also holds my aprons, shopping bags, broom and mop.