No, I haven't forgotten about you all! We have just been busy enjoying the summer weather and trying to find time to do some family things together. It seems like it gets harder to find family time as our kids get older, between different work schedules, travel, friends and hobbies, everyone is always going in a different direction. I have also spent a few days working on my UFO (un-finished objects) sewing box and helping a friend with some sewing. I finished up a stack of layering tank tops for my daughter and am working on a purse I cut a year and a half ago!
On to today's post--my favorite all purpose cleaner. I have been making my own cleaning products for years. I started making my own cleaners simply because we were on a limited budget and I disliked spending $4 for bathroom cleaner that smelled funny. A lot of my original recipes came from reading old magazines (even in the 60's women were trying to save money on cleaners) and books and then experimenting till I found something I liked and worked well for me.
All-Purpose Cleaner
1/2 C. vinegar* (a great disinfectant)
1 tsp. borax (add water softening properties)
1 tsp. liquid soap (use castille or dish detergent)
2 tsp. baking soda (add disinfecting and odor removing)
15 drops Tea Tree essential oil (a great antibacterial-antimicrobial oil) (Or use your favorite essential oil)
warm water
Use a funnel to pour vinegar, borax, liquid soap and baking soda into empty spray bottle. Beware when you add the baking soda the mixture will foam up a bit.
Fill bottle with warm water to within 1" of top.
Place top on bottle and shake gently to mix. Be sure to label your bottle.
~I use this spray for all my general purpose cleaning in the kitchen and bath.
*I use an orange vinegar--place orange peels in a jar and cover with white vinegar. The orange oils in the peels help break down grease, disinfect and add a pleasant smell. Add additional vinegar as needed. Replace peels every 3-4 months.
~This also works with lemon, lime or grapefruit rinds. Or use your favorite herbs for an herbal vinegar, lavender and thyme work well but make a dark colored vinegar (it doesn't stain).
~I use the orange vinegar straight for cleaning the greasy range hood and to clean our grill.
Showing posts with label Homemade cleaners. Show all posts
Thursday, July 14, 2011
Wednesday, February 23, 2011
Crockpot Coffee Kitchen Soap--Tutorial
This is one of my favorite handmade soaps. It works great for onion and garlic smells on your hands. You can buy most of the ingredients at your local grocery store.
This process takes a while, but it is worth the end result. I got 16 slices of soap and 4 decent size (but not pretty) soap balls.
Once you have reached this stage (called trace), you put the lid on the crockpot and let it cook. Check back in about 10 minutes. The outsides should be boiling and it should start to look like a gel.
Keep stirring and checking your soap, it will start to get smoother and will eventually resemble mashed potatoes. Once it has reached this stage, take a small amount and cool it on a plate. Rub it between your fingers, it should feel waxy. Check the ph to see if it is neutral. Continue cooking until the soap tests neutral on the plate. Usually it takes about 30 minutes of total cooking time (after you reach trace), I will usually finish my soap after 30 min. even if I am not quite sure it is neutral. You can check the finished soap to be sure it is neutral, and if it is not, all you have to do is let it cure for a week or two.
Once your soap is ready, add 2 tbsp. almond or castor oil and 2 tbsp. ground coffee and mix well. I like to leave it a little swirled.
Place the finished soap into the mold of your choice. I find it is best to put some soap in then tap the mold a few times to pack it in and repeat until full. I had some soap leftover so I scooped it onto a plate and formed it into balls as it cooled (these are not pretty, but they still function).
Let soap cool completely and remove from mold. In this case, I just tear the container off from the soap.
Slice soap into approx. 1/2" slices. Enjoy clean and fresh smelling hands!
NOTES:
-This is NOT a child friendly project, lye is dangerous stuff. Use caution and common sense. I always made soap when my kids were younger, they knew they were not allowed in the kitchen when mom was making yucky stuff!
-Lye is a form of drain cleaner and can be found at many hardware stores and home improvement centers. Read the labels to make sure you have 100% lye.
-Wear gloves when handling the lye.
-You can check your soap with phenolphthalein or litmus strips when it is done, it should be neutral.
-Leave your bars out to air dry, flipping them over every day, for a week and they will be harder and store longer.
-If you want a plain soap, use water instead of the coffee and leave out the ground coffee. You could add essential oil with the almond oil right before you mold your soap, just use about 1 tsp. of your favorite scent.
-You could also make this other scents like lavender or peppermint and add 2 Tbsp. lavender or peppermint leaves.
-This is one of my favorite hostess gifts with a handmade dishcloth.
This process takes a while, but it is worth the end result. I got 16 slices of soap and 4 decent size (but not pretty) soap balls.
Ingredients:
Cold coffee
Olive Oil
Palm Oil
Coconut Oil
Ground coffee (not instant)
Almond or Castor oil
Lye* (see notes)
Equipment:
Crockpot (I use a crockpot from a garage sale that is just for soap making)
Stainless steel spoon (not aluminum!) -you can use a wooden spoon, just don't use it for food when you are done
Glass jar for mixing lye
Wooden skewer for mixing lye
Postal or kitchen scale that weighs in 1/10th of ounce increments
Phenoolphthalein or litmus strips (in the pool supply aisle)
Soap Mold (I use a pringles can!)
Stick blender (helpful but not necessary)
ALL INGREDIENTS ARE DONE BY WEIGHT!
Weigh 12 oz. of cold coffee into a glass jar. Weigh 4.8 oz. of lye into a small jar or bowl. Slowly add lye into coffee (DO NOT add the coffee to the lye, it will erupt and can cause burns!), stirring with a wooden skewer. DO NOT breathe the fumes. This is going to get HOT! Stir until all of the lye is dissolved. Set aside.
Weigh 18 oz. of olive oil, 8 oz. of coconut oil and 6 ounces of palm oil into your crockpot. I add each oil seperately and then reset the scale.
Turn the crockpot on high to melt the oils.
When the oils are melted, pour in the lye mixture and stir to incorporate.Stir with the spoon constantly without splashing until mixture resembles thick set pudding. This will take approx. 15-30 min. depending on the temperature of your oils. If you have a stick blender, pulse in short bursts, alternating with stirring, you should reach the proper consistency in about 5-8 min. with a stick blender.
Stir and put the lid back on for another 5-10 minutes. I like to check and stir every 5-10 minutes. After about 15 minutes your soap should resemble applesauce, it will be gelled and chunky looking.
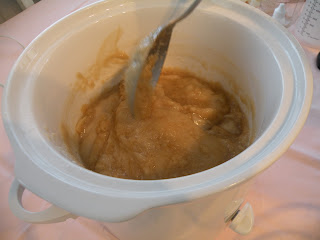
| applesauce stage |
| close-up of applesauce stage, with a drop of phenolphthalein (the red means it is not neutral) |
Keep stirring and checking your soap, it will start to get smoother and will eventually resemble mashed potatoes. Once it has reached this stage, take a small amount and cool it on a plate. Rub it between your fingers, it should feel waxy. Check the ph to see if it is neutral. Continue cooking until the soap tests neutral on the plate. Usually it takes about 30 minutes of total cooking time (after you reach trace), I will usually finish my soap after 30 min. even if I am not quite sure it is neutral. You can check the finished soap to be sure it is neutral, and if it is not, all you have to do is let it cure for a week or two.
| mashed potato stage |
Place the finished soap into the mold of your choice. I find it is best to put some soap in then tap the mold a few times to pack it in and repeat until full. I had some soap leftover so I scooped it onto a plate and formed it into balls as it cooled (these are not pretty, but they still function).
Let soap cool completely and remove from mold. In this case, I just tear the container off from the soap.
Slice soap into approx. 1/2" slices. Enjoy clean and fresh smelling hands!
NOTES:
-This is NOT a child friendly project, lye is dangerous stuff. Use caution and common sense. I always made soap when my kids were younger, they knew they were not allowed in the kitchen when mom was making yucky stuff!
-Lye is a form of drain cleaner and can be found at many hardware stores and home improvement centers. Read the labels to make sure you have 100% lye.
-Wear gloves when handling the lye.
-You can check your soap with phenolphthalein or litmus strips when it is done, it should be neutral.
-Leave your bars out to air dry, flipping them over every day, for a week and they will be harder and store longer.
-If you want a plain soap, use water instead of the coffee and leave out the ground coffee. You could add essential oil with the almond oil right before you mold your soap, just use about 1 tsp. of your favorite scent.
-You could also make this other scents like lavender or peppermint and add 2 Tbsp. lavender or peppermint leaves.
-This is one of my favorite hostess gifts with a handmade dishcloth.
Monday, January 10, 2011
Homemade Powdered Laundry Detergent
A couple of people have asked me about powdered laundry detergent. Here is the recipe:
1/2 cup 20 mule team borax
Mix together and store in a container. Use 2 Tablespoons per load. A lot of powdered drinks come with a 2 T. scoop that you could use.
I do not use the powdered detergent very often because it is not as cost effective as the liquid, but it is great for camping or traveling when you don’t want to have to lug a big bottle of detergent along. I have never used any other soap than the fels-naptha for this (I bought a case), but you could always try it with castille or Ivory soap.
1 cup grated Fels Naptha Soap (I use the fine side of a hand grater for this to be sure the soap fully dissolves)
1/2 cup washing soda1/2 cup 20 mule team borax
Mix together and store in a container. Use 2 Tablespoons per load. A lot of powdered drinks come with a 2 T. scoop that you could use.
I do not use the powdered detergent very often because it is not as cost effective as the liquid, but it is great for camping or traveling when you don’t want to have to lug a big bottle of detergent along. I have never used any other soap than the fels-naptha for this (I bought a case), but you could always try it with castille or Ivory soap.
Sunday, January 9, 2011
Homemade Laundry Detergent
This is an updated tutorial of one of my all-time most requested homemade cleaner recipes!
There are a several different recipes for homemade laundry detergent on the internet, most of them involve giant buckets of thick, gloppy liquid--which is what I used for several years, but when we had to down size into a tiny townhouse we just didn't have room for a bucket anymore. I didn't want to give up the cost savings of homemade detergent for the convenience of the tiny bottles of concentrated detergent, so I came up with a way to concentrate the homemade detergent to fit my space.
Depending on the cost of your ingredients, this detergent only cost between $.01 and $.03 a load! Compare that with even the cheapest detergents on the market and you can really save. We find it is not necessary to use fabric softener with this detergent, except occasionally in the winter. You can find my tutorials for homemade fabric softener/dry sheets here.
Homemade Laundry Detergent
You only need 3 ingredients and 10 minutes!
1. 1/3 bar of soap (I prefer fels-naptha, but I know others have had success with ivory, dreft and even dollar store soap, so choose something you like the scent of that doesn’t bother your skin) (cost. approx. 33 cents)
2. Borax-1/2 Cup (this is available at just about any department or grocery store in the detergent aisle)(cost. approx. 7 cents per 1/2 cup)
3. Washing Soda-1/2 Cup (this is a little harder to find, but check your local grocery-again in the detergent aisle) (cost. approx. 10 cents per 1/2 cup)
4. Water -1 gallon (plain ole tap water is just fine–I would avoid pond water, smelly lake water, etc… :0) (cost. approx 5 cents per gallon using tap water)
Total cost: Approx. 55 cents per gallon. 64 loads per gallon.
Step 1:
Grate 1/3 bar of soap. I like to use the fine side of a hand grater. You don’t want powder, just small shreds.
Step 2:
Dissolve soap shreds into 1 qt. warm water over low heat. Stir until completely dissolved.
Step 3:
Add 1/2 cup EACH of borax and washing soda. Continue stirring over low heat until powders are dissolved and mixture becomes thickened (only take a couple of minutes) –sorta like a soft-set pudding. Don’t worry if it doesn’t thicken up too much, it still is effective.
Step 4:
Pour thickened mixture into 3 quarts of cool (not cold)water in container. Stir thoroughly. This will fairly quickly become a giant mass of jelly like substance. You can stir as it cools for a few minutes to thoroughly mix the gel.
That’s it- you have made homemade laundry soap! You can store your soap in whatever you find convenient. A bucket works well, especially if you have a loose fitting lid to keep stuff from falling into the bucket. Also, you could reuse a laundry detergent container you already have.
To use the detergent you only need to add 1/4 C. to each load. Your laundry will come out clean and fresh smelling! The bonus to this detergent is that I have been able to virtually eliminate the need for fabric softener. Occasionally in the winter I find the need for some fabric softener.
This laundry detergent does NOT produce a lot of suds and is safe to use in the new HE washers and front loaders! It does not look like it is doing much, but it really does work.
If you feel your soap is too thick and gloppy, you can add an extra gallon of water (be sure to use a 2 gallon bucket) when you are mixing it up and then use 1/2 cup per load. You might have to let it sit overnight to really set up if you use this much water.
There are a several different recipes for homemade laundry detergent on the internet, most of them involve giant buckets of thick, gloppy liquid--which is what I used for several years, but when we had to down size into a tiny townhouse we just didn't have room for a bucket anymore. I didn't want to give up the cost savings of homemade detergent for the convenience of the tiny bottles of concentrated detergent, so I came up with a way to concentrate the homemade detergent to fit my space.
Depending on the cost of your ingredients, this detergent only cost between $.01 and $.03 a load! Compare that with even the cheapest detergents on the market and you can really save. We find it is not necessary to use fabric softener with this detergent, except occasionally in the winter. You can find my tutorials for homemade fabric softener/dry sheets here.
Homemade Laundry Detergent
You only need 3 ingredients and 10 minutes!
1. 1/3 bar of soap (I prefer fels-naptha, but I know others have had success with ivory, dreft and even dollar store soap, so choose something you like the scent of that doesn’t bother your skin) (cost. approx. 33 cents)
2. Borax-1/2 Cup (this is available at just about any department or grocery store in the detergent aisle)(cost. approx. 7 cents per 1/2 cup)
3. Washing Soda-1/2 Cup (this is a little harder to find, but check your local grocery-again in the detergent aisle) (cost. approx. 10 cents per 1/2 cup)
4. Water -1 gallon (plain ole tap water is just fine–I would avoid pond water, smelly lake water, etc… :0) (cost. approx 5 cents per gallon using tap water)
Total cost: Approx. 55 cents per gallon. 64 loads per gallon.
Step 1:
Grate 1/3 bar of soap. I like to use the fine side of a hand grater. You don’t want powder, just small shreds.
Step 2:
Dissolve soap shreds into 1 qt. warm water over low heat. Stir until completely dissolved.
Step 3:
Add 1/2 cup EACH of borax and washing soda. Continue stirring over low heat until powders are dissolved and mixture becomes thickened (only take a couple of minutes) –sorta like a soft-set pudding. Don’t worry if it doesn’t thicken up too much, it still is effective.
Step 4:
Pour thickened mixture into 3 quarts of cool (not cold)water in container. Stir thoroughly. This will fairly quickly become a giant mass of jelly like substance. You can stir as it cools for a few minutes to thoroughly mix the gel.
That’s it- you have made homemade laundry soap! You can store your soap in whatever you find convenient. A bucket works well, especially if you have a loose fitting lid to keep stuff from falling into the bucket. Also, you could reuse a laundry detergent container you already have.
To use the detergent you only need to add 1/4 C. to each load. Your laundry will come out clean and fresh smelling! The bonus to this detergent is that I have been able to virtually eliminate the need for fabric softener. Occasionally in the winter I find the need for some fabric softener.
This laundry detergent does NOT produce a lot of suds and is safe to use in the new HE washers and front loaders! It does not look like it is doing much, but it really does work.
If you feel your soap is too thick and gloppy, you can add an extra gallon of water (be sure to use a 2 gallon bucket) when you are mixing it up and then use 1/2 cup per load. You might have to let it sit overnight to really set up if you use this much water.
Saturday, January 8, 2011
Homemade Hand Sanitizer
Cold and flu season is in full swing around here, and everywhere you go there are bottles of hand sanitizer sitting around–in the stores, at church, even some restaurants, not to mention all the little portable bottles stuffed in purses, diaper bags and glove compartments. While I am a fan of the protection from germs that hand sanitizer can offer, I am not a big fan of the dryness and sometimes funky scent it leaves behind, not to mention the price!
Here is a handy homemade version that is inexpensive, less drying and you can choose your scent.
Ingredients:
Aloe Vera Gel (make sure you get gel and not juice or it will be way too thin!)
Isopropyl Alcohol (70%)
Essential oil
Small pump or flip top bottles

Mix equal parts of aloe vera gel and alcohol. I just eyeball it, but you can measure if you feel more comfortable. Then add essential oil to desired strength. I use 8-10 drops depending on what scent I am using.

You can also make this using glycerine in place of the aloe vera gel, but it can be pretty thin. Use Tea Tree or Lavender oil for extra anti-bacterial protection. Pour into your favorite containers and you are ready to go.

This only cost pennies to make and you can use your favorite scent. Try lemon for a light, clean scent, orange for a fruitier scent or peppermint for a scent kids love!
*Notes: There are some articles out there that say unless it is 60 percent alcohol it is not effective, so you can add more alcohol. I use tea tree oil which has anti-bacterial properties, so I leave mine at half and half. Nothing is guaranteed to protect you from all germs, so use what you are comfortable with for your family.
Here is a handy homemade version that is inexpensive, less drying and you can choose your scent.
Ingredients:
Aloe Vera Gel (make sure you get gel and not juice or it will be way too thin!)
Isopropyl Alcohol (70%)
Essential oil
Small pump or flip top bottles
Mix equal parts of aloe vera gel and alcohol. I just eyeball it, but you can measure if you feel more comfortable. Then add essential oil to desired strength. I use 8-10 drops depending on what scent I am using.
You can also make this using glycerine in place of the aloe vera gel, but it can be pretty thin. Use Tea Tree or Lavender oil for extra anti-bacterial protection. Pour into your favorite containers and you are ready to go.
This only cost pennies to make and you can use your favorite scent. Try lemon for a light, clean scent, orange for a fruitier scent or peppermint for a scent kids love!
*Notes: There are some articles out there that say unless it is 60 percent alcohol it is not effective, so you can add more alcohol. I use tea tree oil which has anti-bacterial properties, so I leave mine at half and half. Nothing is guaranteed to protect you from all germs, so use what you are comfortable with for your family.
Homemade Fabric Softener and Dryer Sheets
Liquid Fabric Softener
The easiest alternative is to buy yourself a gallon of vinegar and then add 10-20 drops of your favorite essential oils. DO NOT use fagrance oils as they may contain artificial colors or scents that could damage your clothes! I personally like lavender, peppermint or eucalyptus. You can put this in your fabric softener ball and it does not leave a residue on your machine.
Fresh Lemon Fabric Softener
You will need 2 C. water, 5 C. white vinegar, 1 C. baking soda, 20 drops lemon essential oil

Mix vinegar and water in 1/2 gallon jar, THEN slowly add the baking soda. DO NOT try and add the vinegar to the baking soda or you end up with this:

Finally, add your lemon essential oil. You use 1/2 – 1 C. per load of laundry. Again, I like to stick it in the fabric softener ball.
Dryer Sheets
The simplest method: Use a clean cloth place 2-3 drops of essential oil on the cloth and toss in the dryer. Refresh with a drop or two of oil between loads. Wash cloth after every few loads. This adds a nice fragrance and does not ruin your dryer like the store bought sheets.
Some combos to try:
cedarwood and patchouli or sandlewood for a masculine scent
orange oil and geranium for a floral scent
peppermint and eucalyptus for when you have a cold
orange, lemon and grapefruit for a fruity scent
Another option is to mix one gallon water and one cup concentrated liquid fabric softener in a container. Every time you do laundry, dip an old washcloth or 1/2 a sponge into the mix, wring out, and dry with your clothes. Put the lid on the container and don't forget to label.
If you just want fragrance without the extra softener you can mix 1 C. water (distilled or filtered is best), 1/2 C. alcohol (I use isopropyl or vodka) and 20 drops of your favorite essential combo. Place the wet clothes in the dryer and spritz 4-5 times with softener mix and dry as usual. This leaves a nice scent on your clothes without being over-powering.
Happy Laundry!
The easiest alternative is to buy yourself a gallon of vinegar and then add 10-20 drops of your favorite essential oils. DO NOT use fagrance oils as they may contain artificial colors or scents that could damage your clothes! I personally like lavender, peppermint or eucalyptus. You can put this in your fabric softener ball and it does not leave a residue on your machine.
Fresh Lemon Fabric Softener
You will need 2 C. water, 5 C. white vinegar, 1 C. baking soda, 20 drops lemon essential oil
Mix vinegar and water in 1/2 gallon jar, THEN slowly add the baking soda. DO NOT try and add the vinegar to the baking soda or you end up with this:
Finally, add your lemon essential oil. You use 1/2 – 1 C. per load of laundry. Again, I like to stick it in the fabric softener ball.
Dryer Sheets
The simplest method: Use a clean cloth place 2-3 drops of essential oil on the cloth and toss in the dryer. Refresh with a drop or two of oil between loads. Wash cloth after every few loads. This adds a nice fragrance and does not ruin your dryer like the store bought sheets.
Some combos to try:
cedarwood and patchouli or sandlewood for a masculine scent
orange oil and geranium for a floral scent
peppermint and eucalyptus for when you have a cold
orange, lemon and grapefruit for a fruity scent
Another option is to mix one gallon water and one cup concentrated liquid fabric softener in a container. Every time you do laundry, dip an old washcloth or 1/2 a sponge into the mix, wring out, and dry with your clothes. Put the lid on the container and don't forget to label.
If you just want fragrance without the extra softener you can mix 1 C. water (distilled or filtered is best), 1/2 C. alcohol (I use isopropyl or vodka) and 20 drops of your favorite essential combo. Place the wet clothes in the dryer and spritz 4-5 times with softener mix and dry as usual. This leaves a nice scent on your clothes without being over-powering.
Happy Laundry!
Subscribe to:
Posts (Atom)